Step
Procedure
1
Ensure that you completed the "Access the New Announcement screen procedure" before commencing with this procedure. This pertains to creating new SENS announcements.
or
Ensure that you completed the "Access the Announcement Correction screen procedure" before commencing with this procedure. This pertains to correcting disseminated announcements that are incorrect.
2
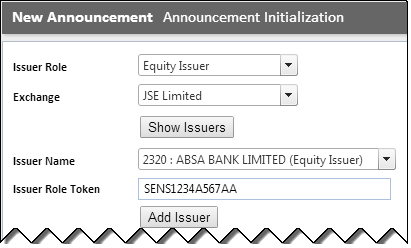
If applicable, select the Issuer Role and the Exchange from the "New Announcement screen".
Note: Refer to the section "New Announcement fields" for information on these fields.
3
Once you have selected the Issuer Role and the Exchange, click the SHOW ISSUERS button.
Note: Once clicked, a list of Issuer names will be populated in the Issuer Name field, based on the Issuer Role and Exchange selected.
4
If applicable, click the <down-arrow> to the right of the Issuer Name field and select the Issuer. Refer to the section "New Announcement fields" for information on this field.

External Users only
You must enter the Token received, via SMS or EMAIL, in the Issuer Role Token field. Refer to the section "Create New Tokens". You have three attempts to enter the Issuer Role Token correctly. After the third attempt your account will be de-activated and you will need to contact the System Administrator to reactivate it. Please note that the Issuer Role Token 'count' is based on the Issuer selected. This means that if you select a different Issuer - after having entered the Token number twice, the 'count' will start again and you will be given another 3 attempts to enter the Token Number correctly.
5
Click the ADD ISSUER button.
Note: The selected issuer details, including instruments, will be populated in the "Issuer Details grid".
IMPORTANT: You can add up a maximum of 5 issuers.
6
You can select another Issuer, if required. Repeat steps 2 - 6.
Note: If the Issuer Role and Exchange remain the same then simply repeat step 5 - 6 in order to select another Issuer.
7
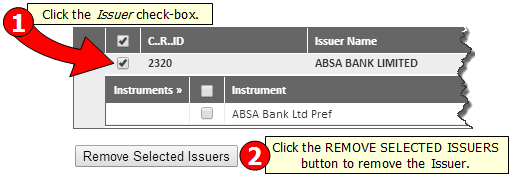
Select the relevant Issuers and Instruments from the "Issuer Details grid".

Note:
Announcements that pertain to more than one company are called "group announcements".
If there is an active instrument, then no other version of that instrument will be displayed.
If there are only future dated instruments then IRS will display the first version of the future dated instruments.
IMPORTANT:
To remove an issuer from the list, simply click the Issuer checkbox and then click the REMOVE SELECTED ISSUERS button. The issuer together with all its linked instruments will be removed.
8
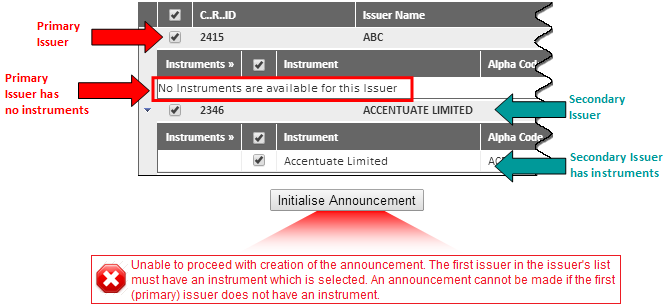
Click the INITIALIZE ANNOUNCEMENT button.
Note: A message will be displayed: "A new SENS submission will be created for the specific issuer details. Do you wish to continue?"
IMPORTANT:
Different Types of Error Messages - Example 1:
If multiple issuers are selected for the same announcement, you must ensure that the PRIMARY ISSUER - that is, the first issuer selected - has instruments attached. If not, you will receive an error message. All other issuers do not have to have instruments attached - only the primary issuer.
Different Types of Error Messages - Example 2:
If no issuers were selected then the following error message is displayed: "At least one Issuer must be selected to make an announcement."
Different Types of Error Messages - Example 3:
An Issuer was selected, but no instruments were selected. The following error message is displayed: "Unable to proceed with creation of the announcement. At least one instrument must be selected to make an announcement."
9
Click the OK button.
Note: The "Submission Detail screen" will be displayed. The "Submission Details screen" is used to provide a consolidated view of the Submission.
10
Fill in all the relevant information on the various tabs.
11
Once complete, return to the "Activity tab", and click the SUBMIT button.
IMPORTANT: Ensure that you entered a 'Release Date and Time' and that you selected an option from the Next Action field on the "Activity tab".
Note: A message is displayed: "You are about to send the instruction for the next action step, do you wish to continue?"
12
Click the OK button.
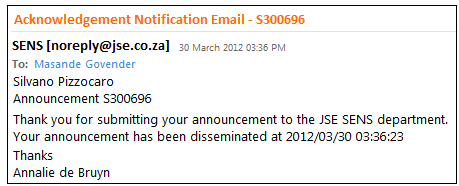
Note: You will receive an email once the announcement has been approved and disseminated by the JSE.